[ad_1]
The Blur Gallery in Adobe Photoshop is different from the Blur Filters we’ve covered previously (both are found in Photoshop’s Filter menu). When you select Blur Gallery, Photoshop displays another dropdown menu with five Blur options: Field, Iris, Tilt-Shift, Path, and Spin Blur. These filters are much more interactive than regular Blur Filters, with live previews and on-image controls, including options to create Bokeh effects.
Blur Gallery Tools
To use Blur Gallery features, open a file, then use the Lasso tool or the Magic Wand to select the area you want to smooth or soften. It works best if you cut out the selected area, paste it back in as a new layer, then ensure that this layer is active in the Layers panel. The blur will affect the entire selected area unless you use the Pins to select specific sections.
 JD Sartain / IDG
Using the blur features in the Blur Gallery
Choose Filter > Blur Gallery > Path Blur (or any of the other four Blur options) to open the Blur Gallery panel, which displays all five of the Gallery Blurs mentioned above, plus three Effects tabs that provide options for Bokeh, Motion, and Noise. Each Gallery Blur and each of the three Effects offer different adjustment tools to fine-tune the special effects on your images.
With the on-screen controls, you can see what the effects are doing to your image as they happen. For example, the main control is a circle with a dot inside called a Pin (the cursor looks like a pin or tack). Click different areas on the image to create multiple Pins, which are potential blur areas. Click the dark line inside the circle and drag it around the circle to increase or decrease the blur effect. You can also use the slider bar for this same function.
 JD Sartain / IDG
Use the Field Blur to soften the graduated levels of color in the blurred background
Field Blur
Use this effect to illustrate a graduated blur effect (similar to a gradient, but using only the colors in the selected area).
Select the layer in the Layers panel that you want to affect. Choose Filter > Blur Gallery > Field Blur. Click the location or locations where you want to blur the image. Use your cursor to select each Blur Pin individually, then drag the spinner inside the circle to blur the different areas.
We chose an image of a field of yellow tulips, deciding to create one different from the rest by changing its color, then blurring out the rest. We colored one of the tulips a bright coral-orange. We outlined it with the Lasso tool, then inverted the layers: Select > Inverse to make the background the active layer.
We moved the Pin up into the sky area, then dragged the line inside the circle until the background was fuzzy but still recognizable.
NOTE: Press the Delete key to remove individual pins, or click the checkbox to toggle check on and off. Off cancels the current blur effect. The Escape key cancels the Blur Gallery.
 JD Sartain / IDG
The Iris Blur effect blurs out everything EXCEPT the selected area
Iris Blur
Use the Iris Blur effect to blur out everything on the canvas except the selected area.
Choose Filter > Blur Gallery > Iris Blur. Position the blur Pin on the section you want to highlight so the focus is clear and sharp. Use the handles to drag the ellipses around, change its shape, increase or decrease its size. You can place multiple Pins on the canvas to “stop” the blur in all the selected areas and just blur what’s left of the background.
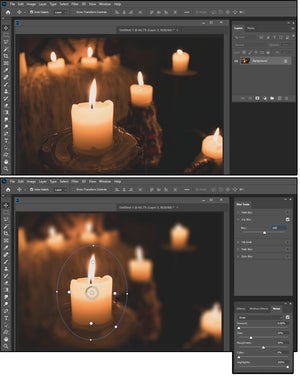
We chose a photo with seven candles on a table, then used the Iris Pin selector to create an ellipse around the center candle. We set the blur effect to 100, which faded and hazed out everything except the selected center candle. Unlike the Field Blur, which works best with multiple Pins or multiple layers, the Iris Blur reacts to everything not Pinned.
 JD Sartain / IDG
Tilt-Shift Blur alters perspective
Tilt-Shift Blur
Photographers use tilt-shift lenses to photograph panoramic views, to modify the scale of an area so it appears miniature, to correct vertical lines that converge, and to blur specific areas of an image.
In Photoshop, the effect is much the same. A tilt-shift lens alters perspective. It looks like it adds a rectangular window (or strip) of sharpened focus to a blurred photo. But, in fact, it maintains the sharp focus inside the window and blurs out the rest in a graduated fade.
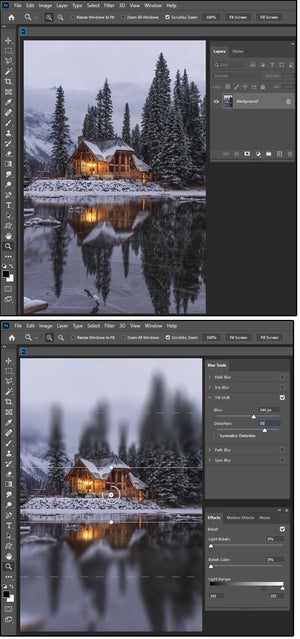
In our example, we decided to focus on the cabin and make the trees, mountains, and the sky on top gradually fade from sharp to hazy; then phase out the water and reflections on the bottom to simulate an eerie, ghostly feeling.
We divided the image into five sections, maintained the sharp center, and fuzzed out the rest. We chose 144 pixels for the Blur and 55 for the Distortion.
Path Blur
The Path Blur does the obvious: It creates a blurred area along a selected path that simulates motion. When you select Filter > Blur Gallery > Path Blur, a line with an arrow and a large pin dot appear on the right, a small pin dot appears in the center, and another large pin dot appears on the left.
 JD Sartain / IDG
Path Blur create a blurred path of motion
If you drag the pin dots in any direction, the line that connects them bends and arcs up, down, left, right, or in and out of spirals, hooks, and loops. If you click the pin dot first (a smaller dot appears inside the pin dot), then you can drag a straight line in any direction. You can also use the pin tack cursor to add more pin dots to the image, which creates multiple blur paths.
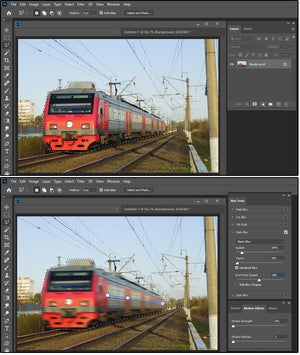
For our example, we moved the line of pin dots down to the side of the train, then stretched it out from the engine to the caboose, following the line of the tracks to simulate a fast moving train soaring down the tracks at high speed. We set the Basic Blur Speed to 50 percent, the Taper to 0, checked the Centered Blur box, and chose an End Point Speed of 200 pixels. This provided an illusion of a speeding train, which is the effect we wanted.
NOTE: If the Basic “Path” Blur doesn’t provide the effect you seek, try the Rear Sync Flash Blur, which emulates that flash effect that fires at the end of an exposure.
Spin Blur
The Spin Blur is, basically, the same as the Radial Blur, except the Blur Angle is measured in degrees from 0 to 360. When you choose Filter > Blur Gallery > Spin Blur, a circle appears in the middle of your image with tiny dots at north, south, east, and west; and pinpoints appear just inside the circle at the same locations.
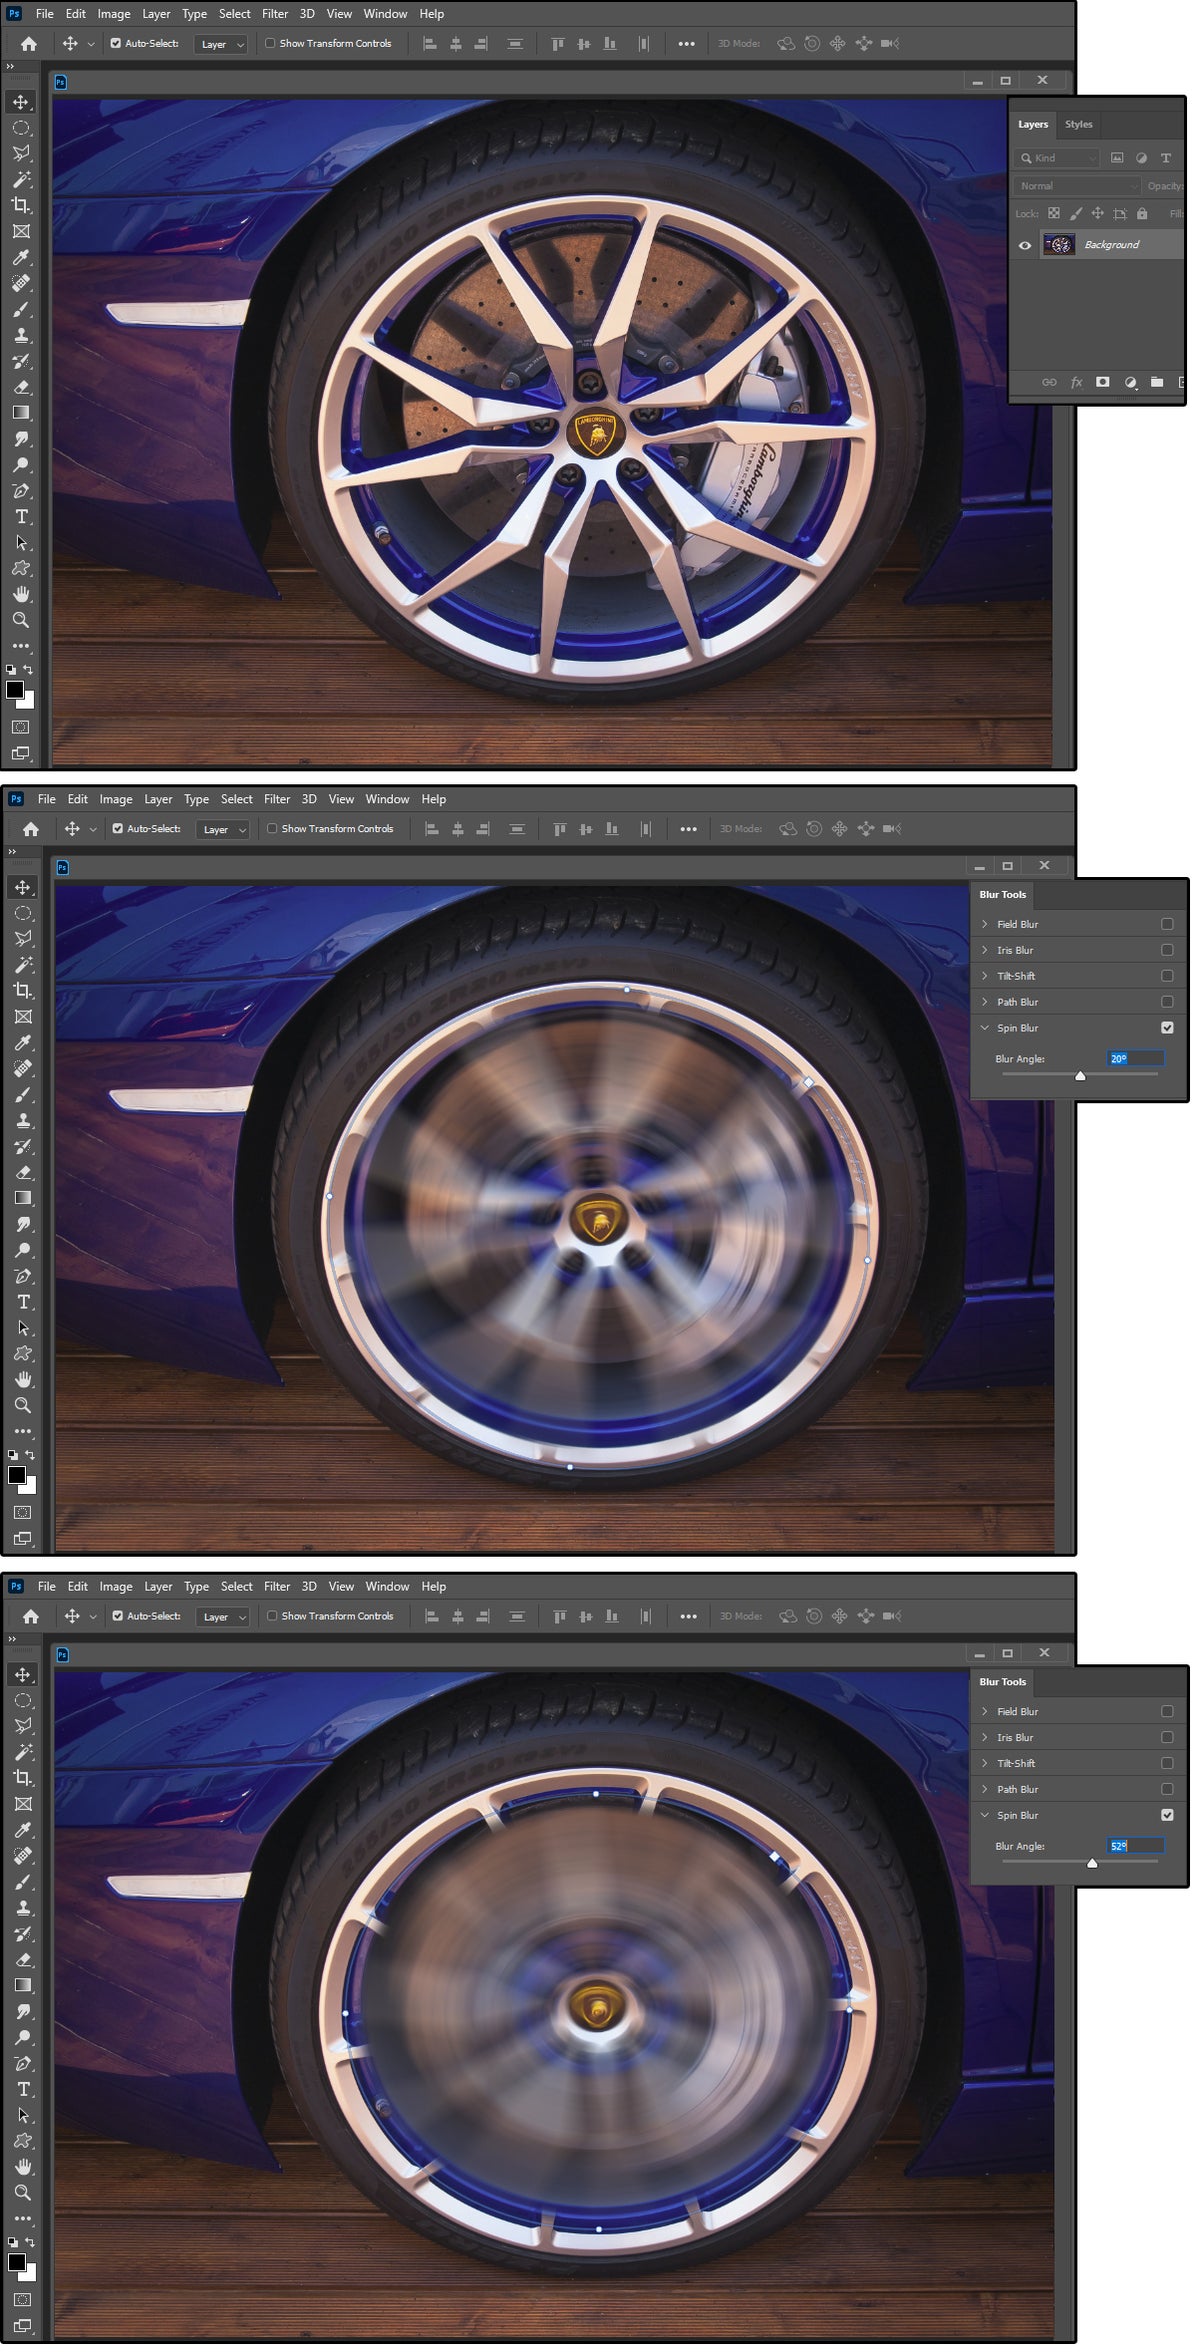 JD Sartain / IDG
Spin Blur is measured in degrees
Use the dots to reshape and rotate the outer circle. Use the square handles to size it, and the pinpoint dots to reshape the inside, which is the area that spins.
We chose to spin a couple of tires. We selected a Blur Angle of 20 degrees for the first and a Blur Angle of 55 degrees for the second to illustrate the different angles and the precise control one has over manipulating the spinning radius.
Gallery Effects Tools
Bokeh Effects
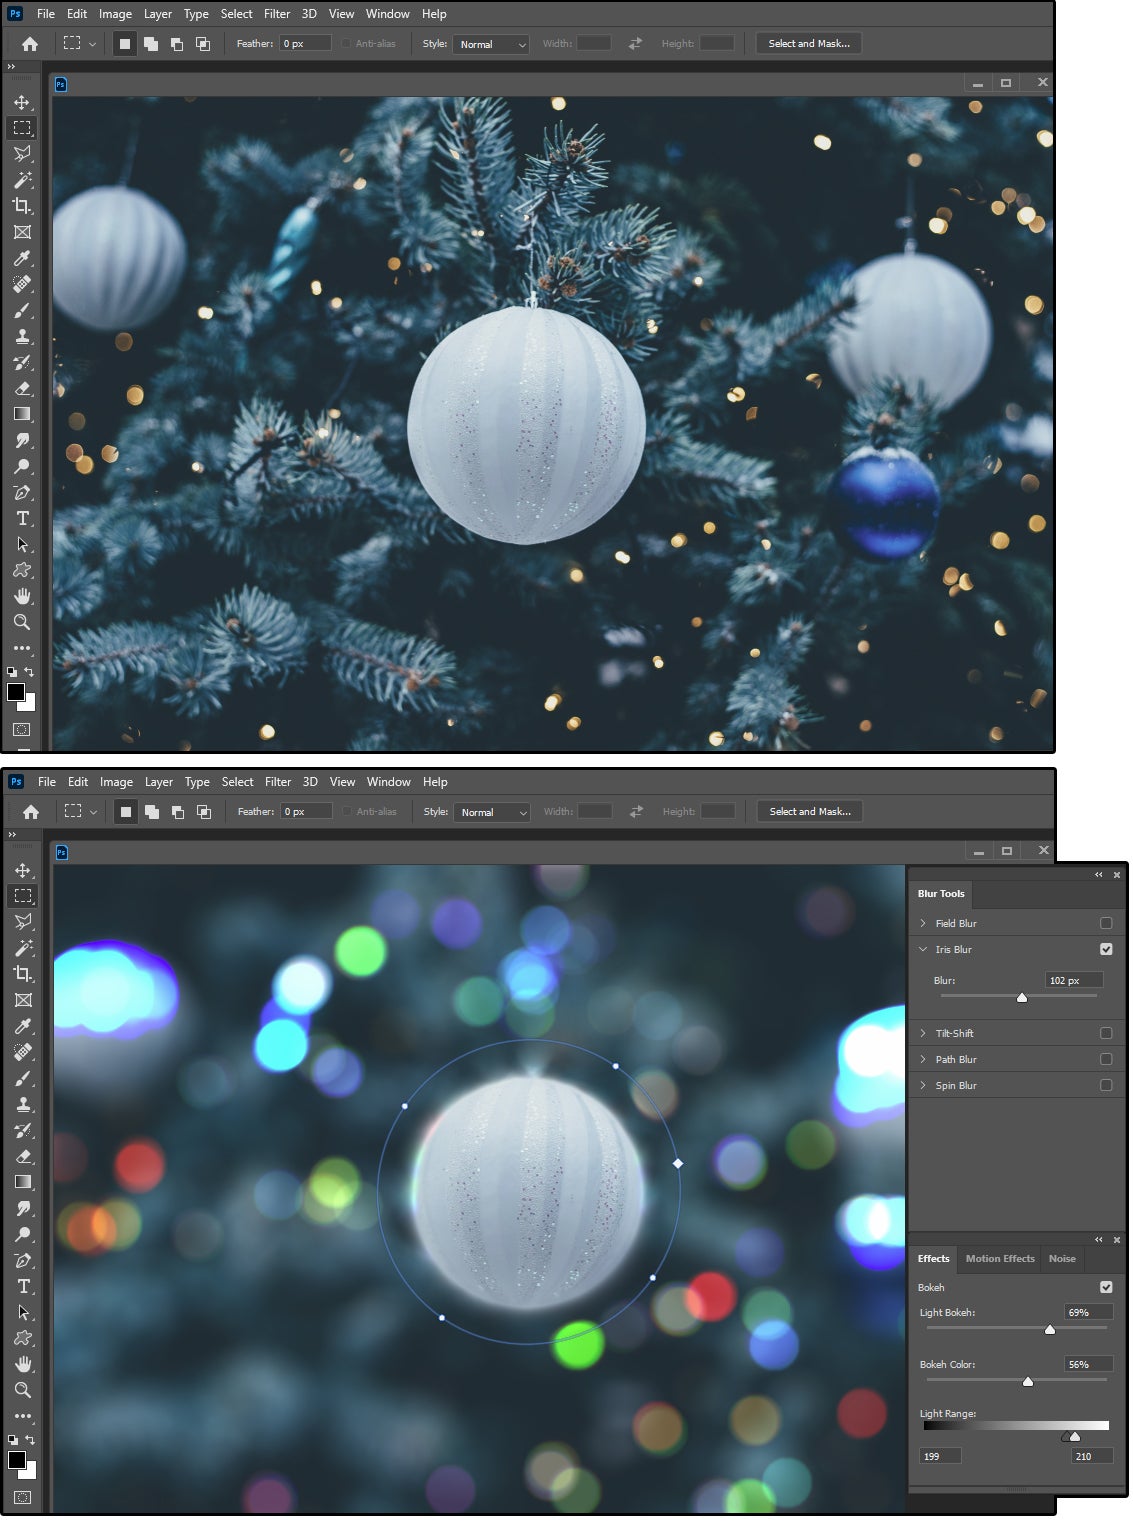 JD Sartain / IDG
Bokeh affects the quality of reflected light in the shallow depth of field
As described in the second paragraph, the Bokeh effects in our example create smooth, silky circles of light with soft, glowing edges.
Notice that the background lights around the ornament in our Christmas photo are gold and white only, and appear as confetti-like dots on the tree. After we applied an Iris Blur of 102 pixels, with 69 percent of Bokeh Light, 56 percent of Bokeh color, and a Light Range of 210, the ornament now glows on a background of soft, colorful lights.
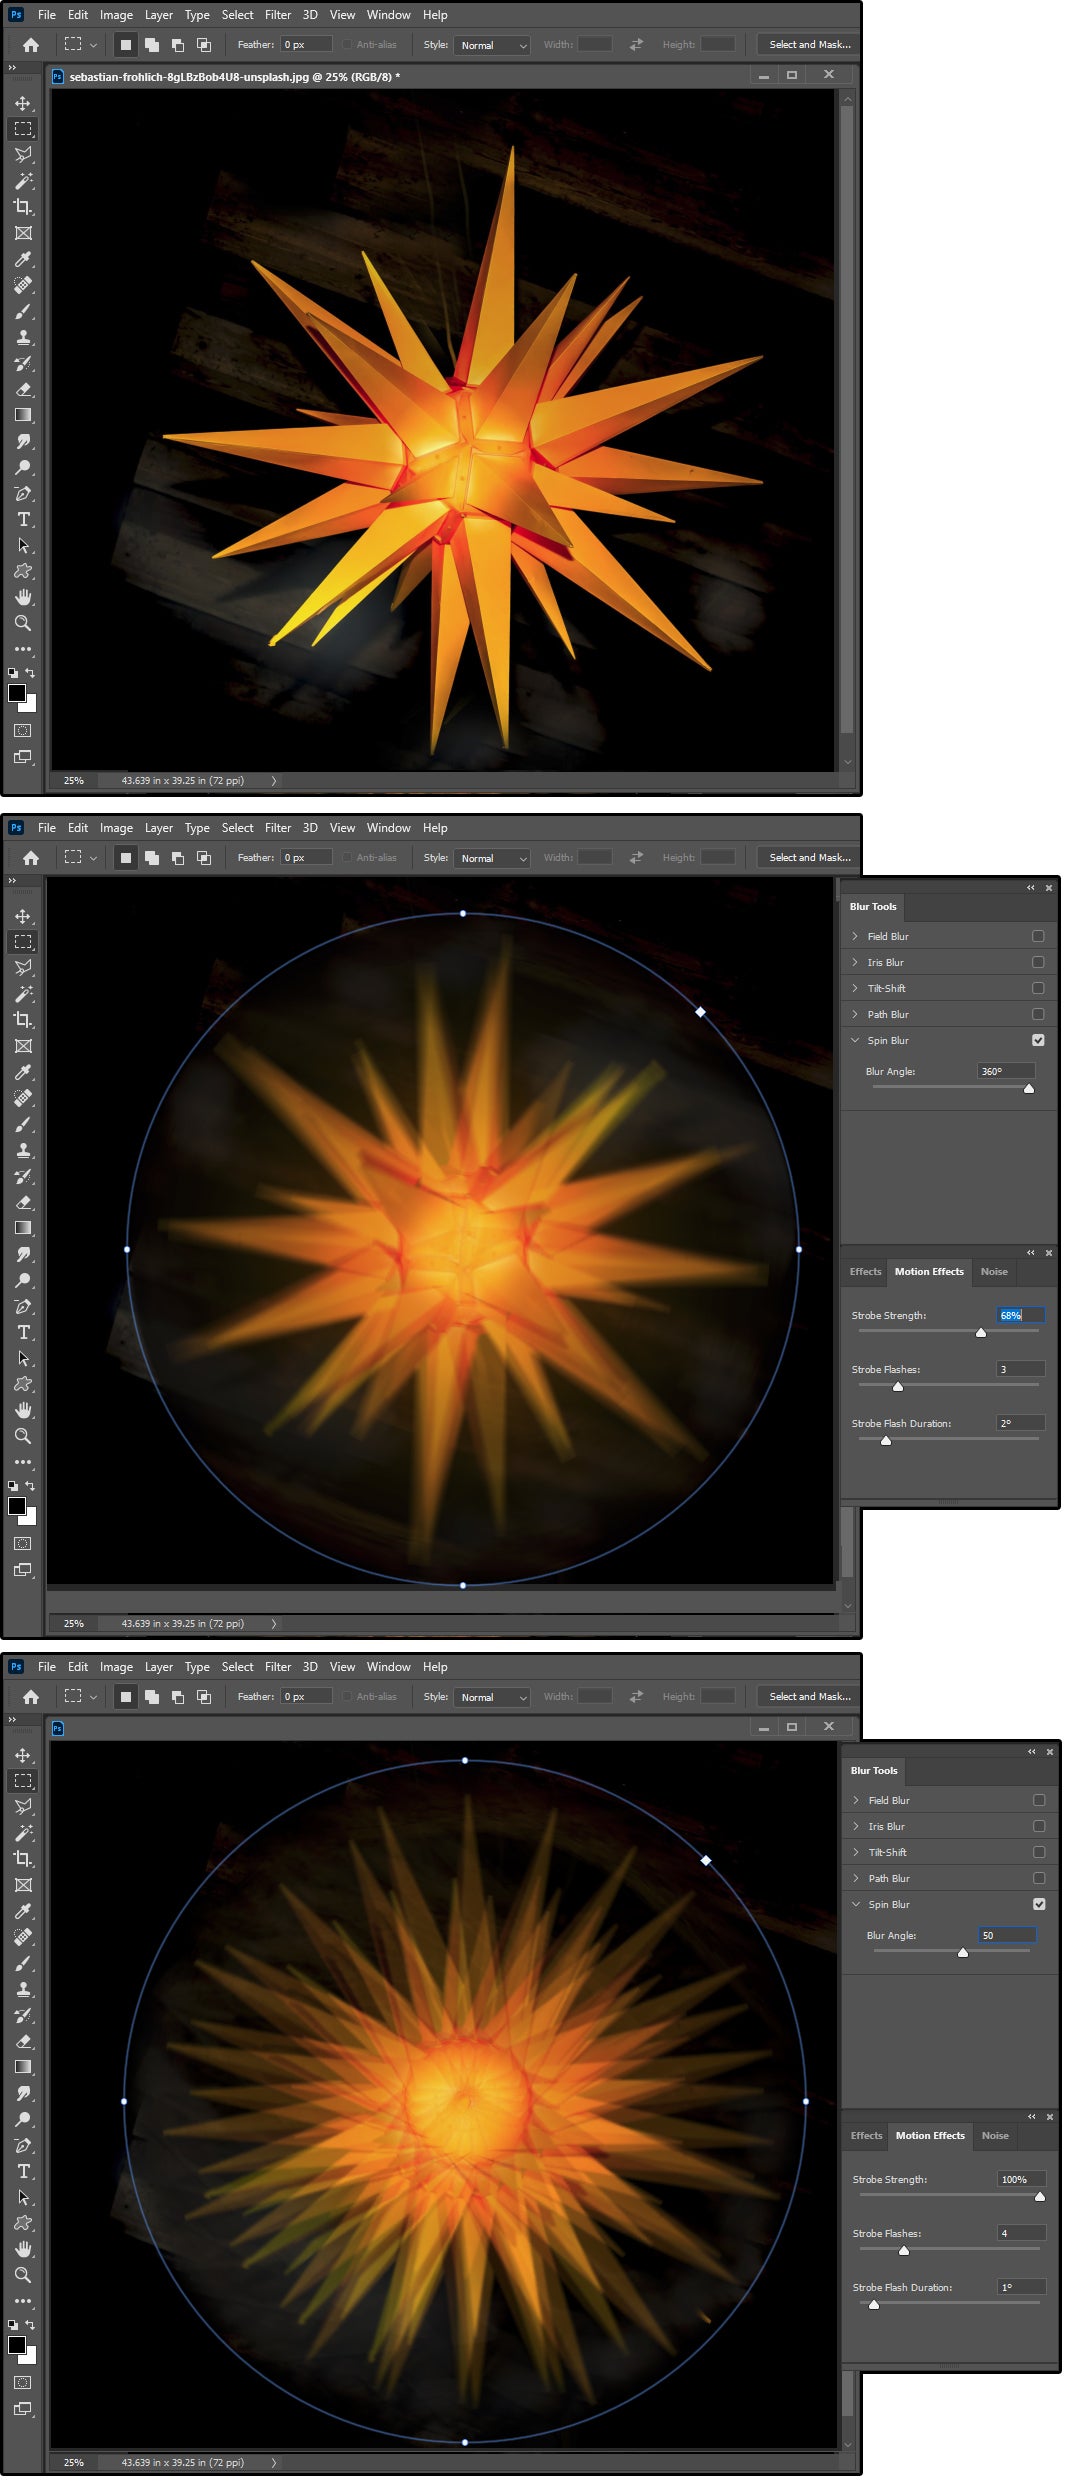
Motion Effects
These effects work only on Spin Blur and Path Blur. There must be a path or radius of motion to get Motion Effects.
 JD Sartain / IDG
Motion Effects
The process is simple. Open a file, choose Filter > Blur Gallery > Path Blur or Filter > Blur Gallery > Spin Blur. Use the Pinpoints, the dots, and the handles to size and position your path or radius around your object (or across the entire image). Select a Blur Angle, then use the Motion features to create some amazing effects.
We used a 22-point star to create two very different Motion effects.
We started with a Spin Blur. The first one has a Blur Angle of 360 degrees with 68 percent Strobe Strength, three Strobe Flashes, and a Strobe Flash duration of two degrees.
The second image has a Blur Angle of 50 degrees with 100 percent Strobe Strength, four Strobe Flashes, and a Strobe Flash duration of one degree.
Both designs look amazing, but so different. One looks like a flaming star, and the other looks like a sunburst. The Motion Effects completely change from one setting to another.
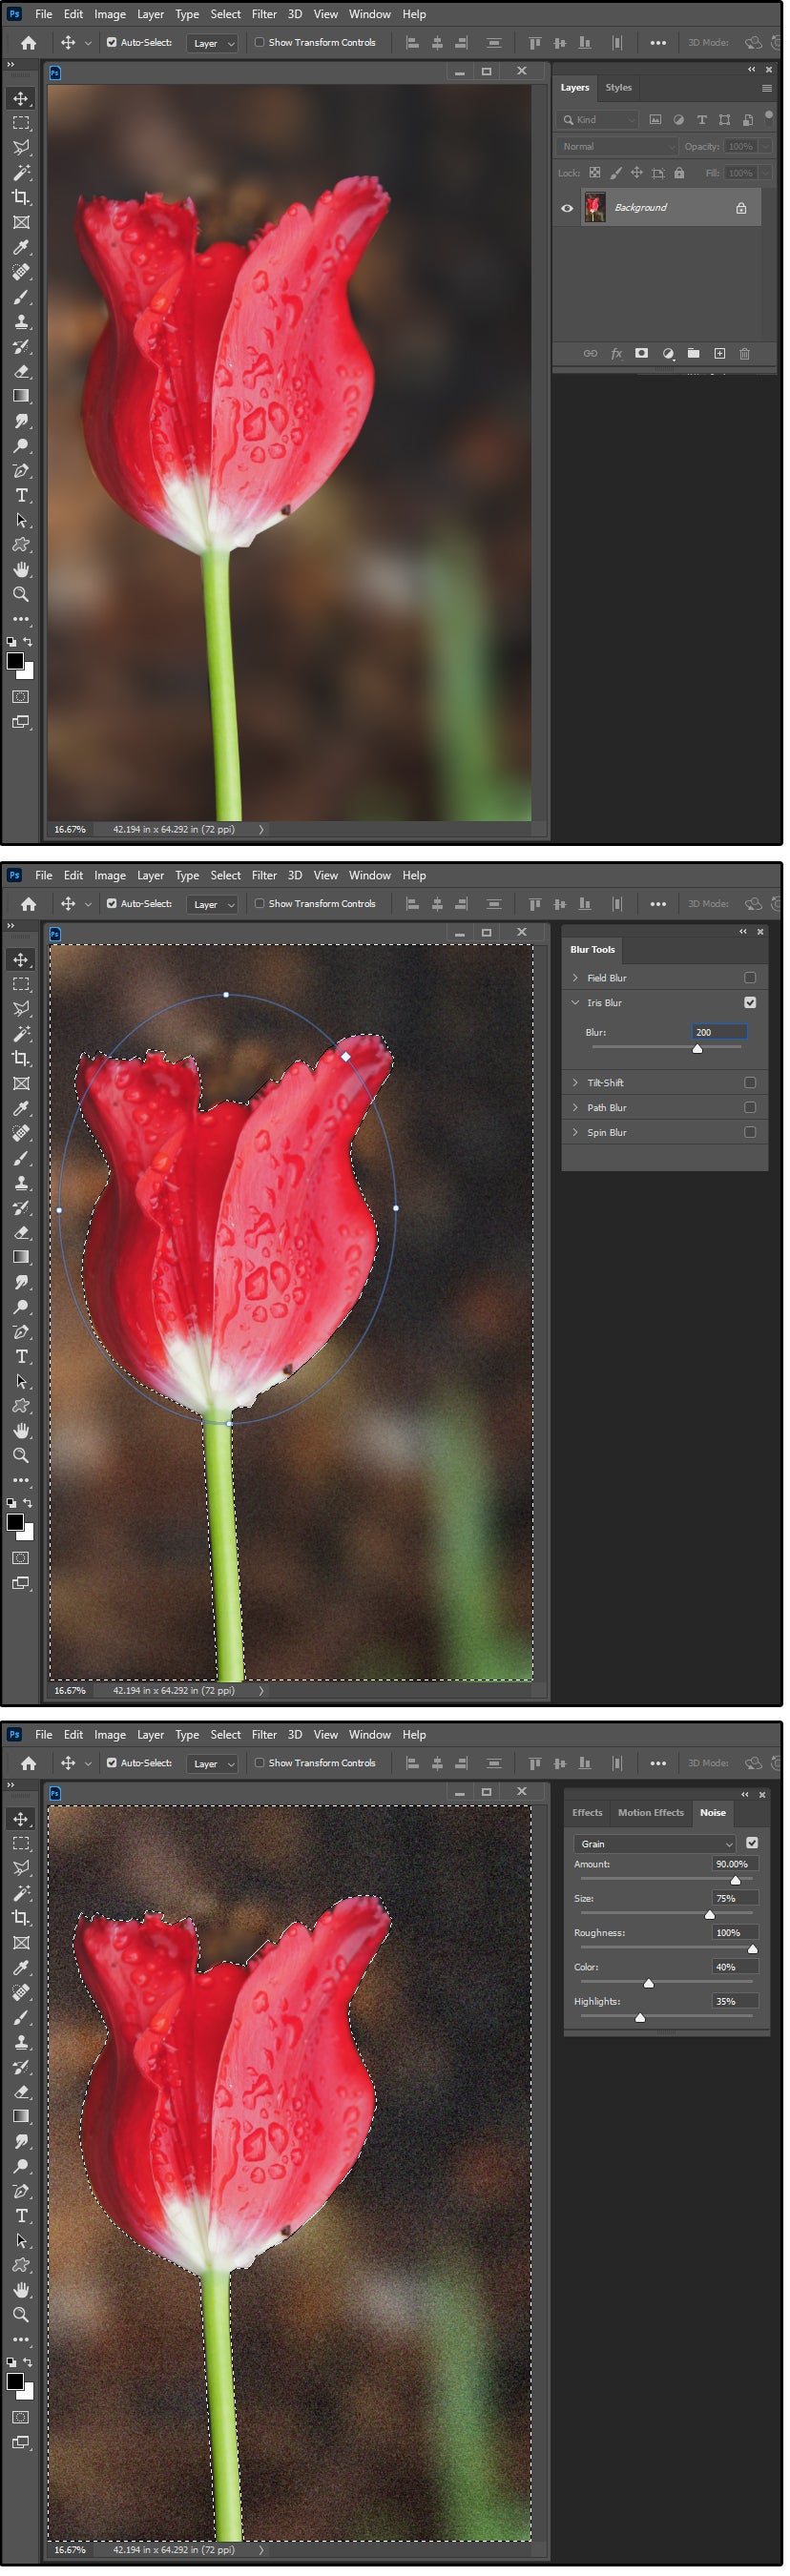
Noise Effects
Noise is another word for grain, or a grainy effect.
 JD Sartain / IDG
Noise Effects
You can add noise anywhere on your photos, and there are several ways to do it. This effect is used with the Blur Gallery effects so you can add back some detail or texture to a blurred section.
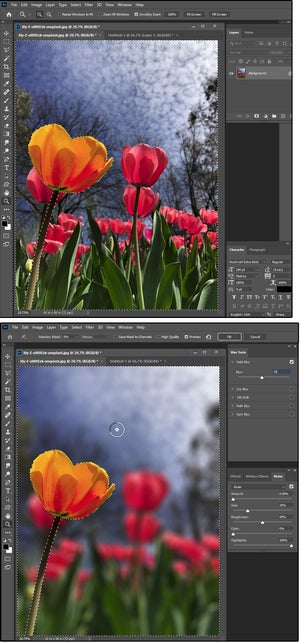
We first used the Iris Blur (set to 200) to blend out the background of a red tulip. There was nothing essentially wrong with this result, but after a few days of looking at it, we decided to give the image more depth.
We used the Noise Effect in the Blur Gallery to add some needed texture to the background. We added 90-percent grain at a size of 75 percent with 100-percent roughness, 40-percent color, and 35-percent highlights. The dull, flat background was transformed to a finely textured finish.
[ad_2]
Source link